

In today's digital era, the need for online payment solutions is paramount, driven by the rapid evolution of diverse industries. However, developing a robust payment SDK presents its own set of challenges, particularly in sectors such as healthcare and finance.
This tutorial will guide you through the process of constructing a payment SDK, focusing on iframe integration and window cross-communication techniques.
This tutorial aims to provide comprehensive insights into building a versatile payment SDK.
Prerequisite:
To properly understand this article, you'll need to understand.
Javascript
DOM Manipulation
How to use a code editor
IFrames
postMessage and contentWindow API
A vercel account and basic knowledge of git
What is a payment SDK?
Payment SDK means Sticitt's software development kit that enables the virtual authorisation and payment of purchases by Account Holders, for products and/or services from Merchants.
What are the benefits of building a custom payment SDK?
Seamless User Experience:
One of the benefits of building a payment gateway from the ground up is that you can optimize the user experience. You can guarantee smooth user interactions and user satisfaction by designing payment flows, interfaces, and navigation that are easy for people to use.
No Vendor lock-in
The main advantage of building your own payment gateway is that it will keep you independent of pay service providers. Dependence on an outside source may lead to vendor lock-in, which severely restricts your ability to change payment methods without incurring significant costs.
Your power is limited when you are committed to a certain vendor, making you susceptible to future drawbacks like changing terms of service and fees that could eventually be detrimental to you.
Custom Made features
Are you hoping to succeed and set your platform apart from the competition? Intelligent functionalities and innovation hold the key. Building your own payment gateway gives you access to a wide range of capabilities that are required for organizations with different demands.
With the ability to integrate all the features that meet your specific business needs, a custom-built payment gateway allows you to support marketing campaigns, enable cryptocurrency transactions, and facilitate recurring payments.
Extra Profits
Creating your own payment gateway can help you make back your original investment and create prospects for profit if you operate it as a distinct business. You can profit from your investment in a variety of ways when you own a payment gateway. Selling or renting your payment gateway to other businesses looking for products with comparable feature sets is one way to go about it. You can create more revenue streams by letting other companies use your well-designed and dependable payment gateway.
In this article, I will be showing you how to build an SDK that can be integratabtle across any javascript application.
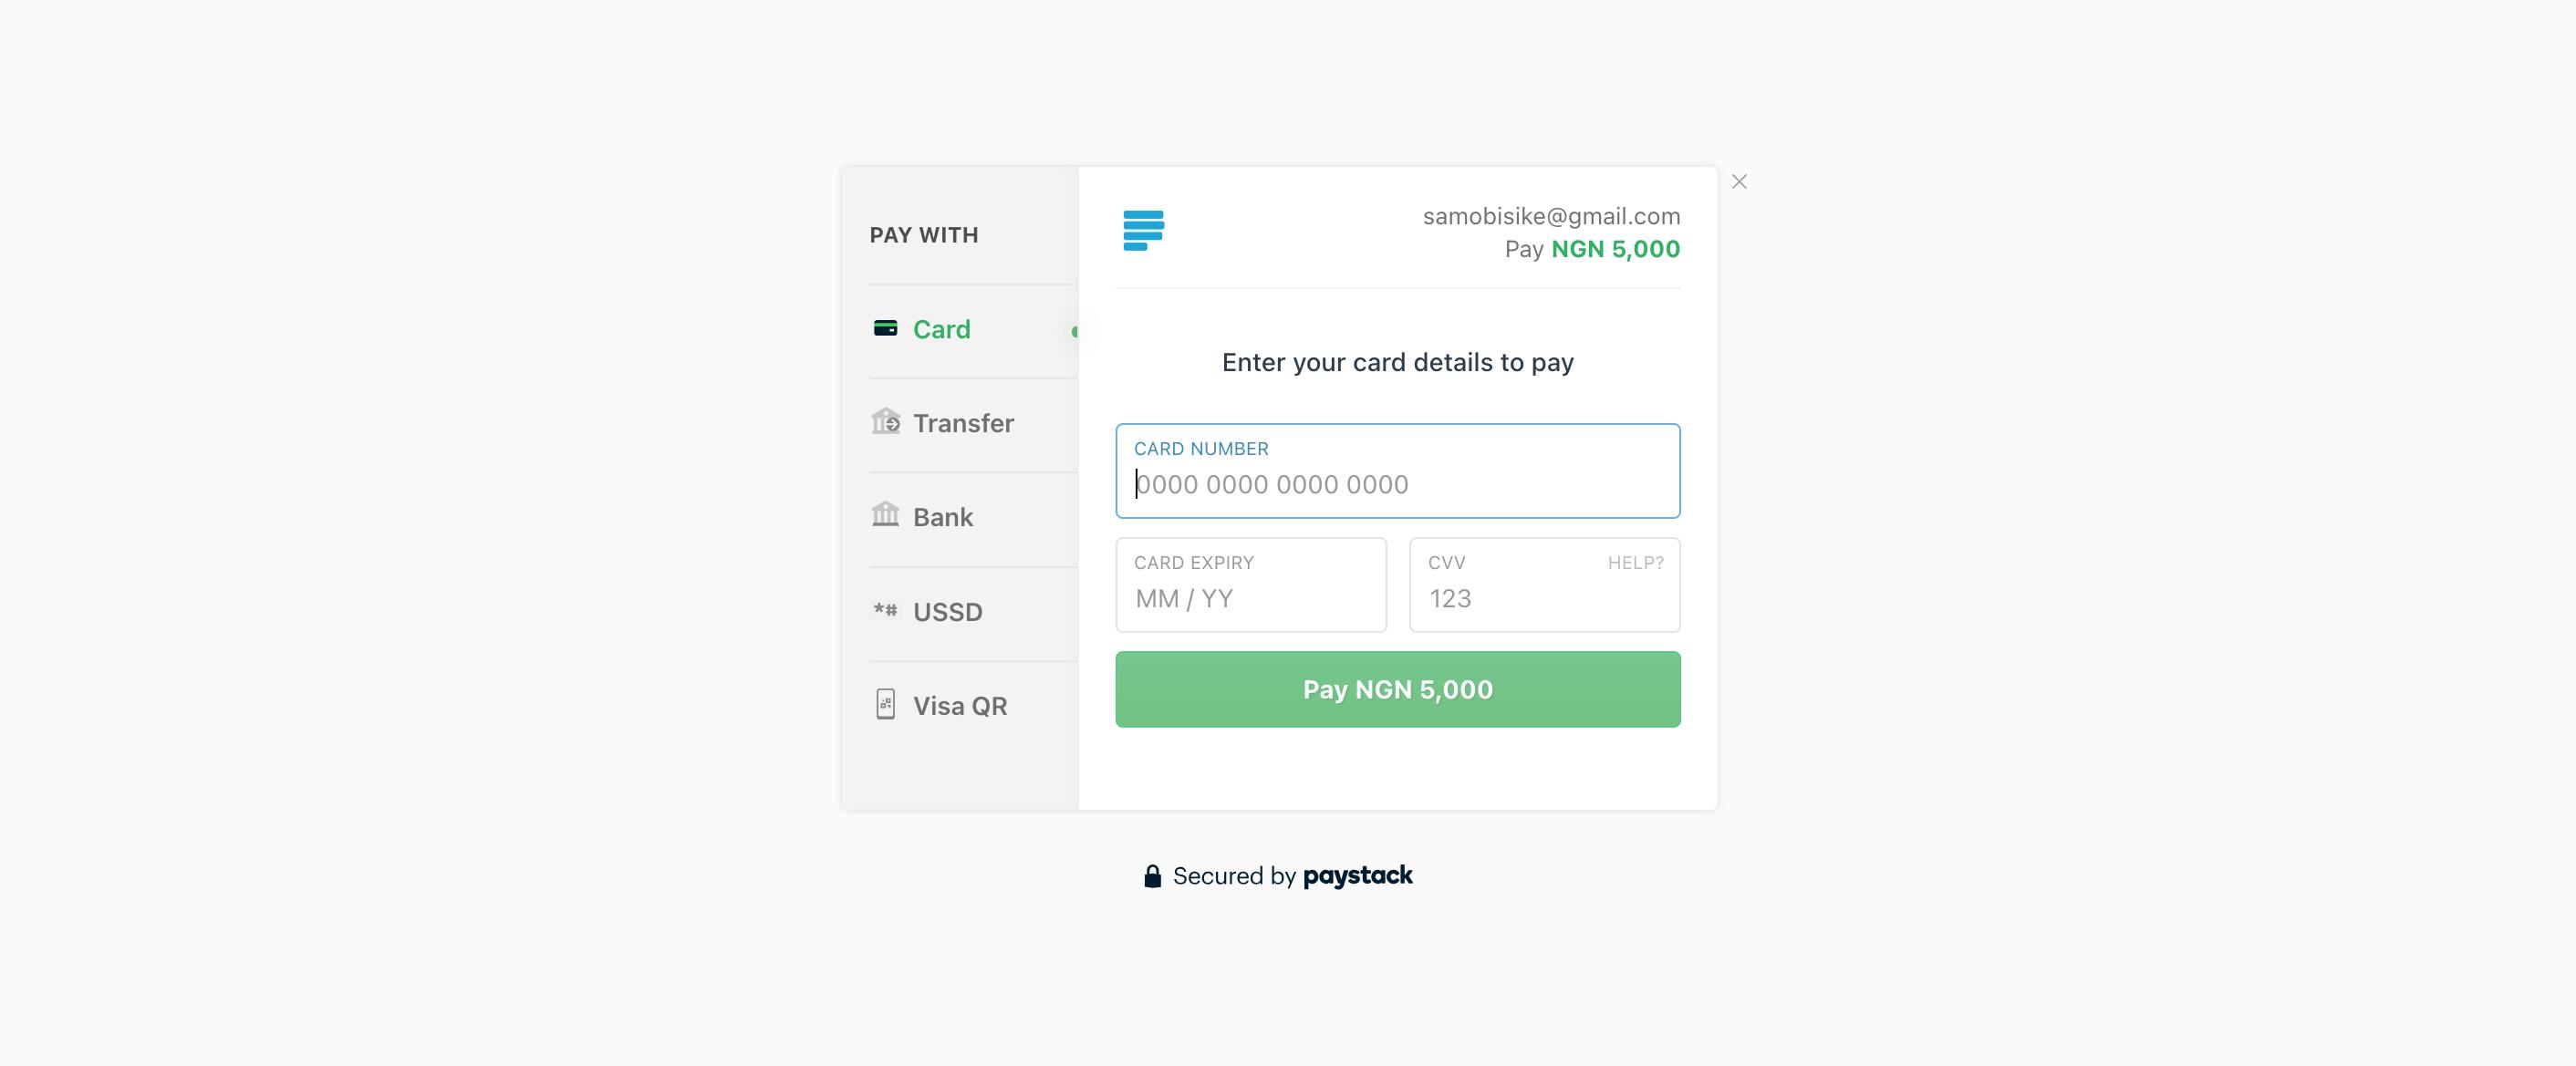
Have you come across an interface and seen a payment gateway like the image, with code samples like this.
<html>
    <div>
      <button onclick='paystack()'>Pay with paystack</button>
    </div>
    <script type="application/javascript" src="<https://cdn.paystack.co/v1/chain.js>"></script>
</html>
<script type="application/javascript">
const paystack = new Paystack.pay({
       publicKey: "pspk_test_2aj8kvr3pkuvko",
        amount: 50000,
        currency: "NGN",
        userReference: "73f03de5-1043-4ad1-bc2e-aa4d94ebee4f",
        onSuccess: function(response) {
        console.log(response.event);
      },
      onClose: function() {
        console.log('user closed the widget.')
      },
      onError: function(error) {
        console.log(error)
      }
    });
</script>

</html>
So we will be building an application called Nyerishi Pay.
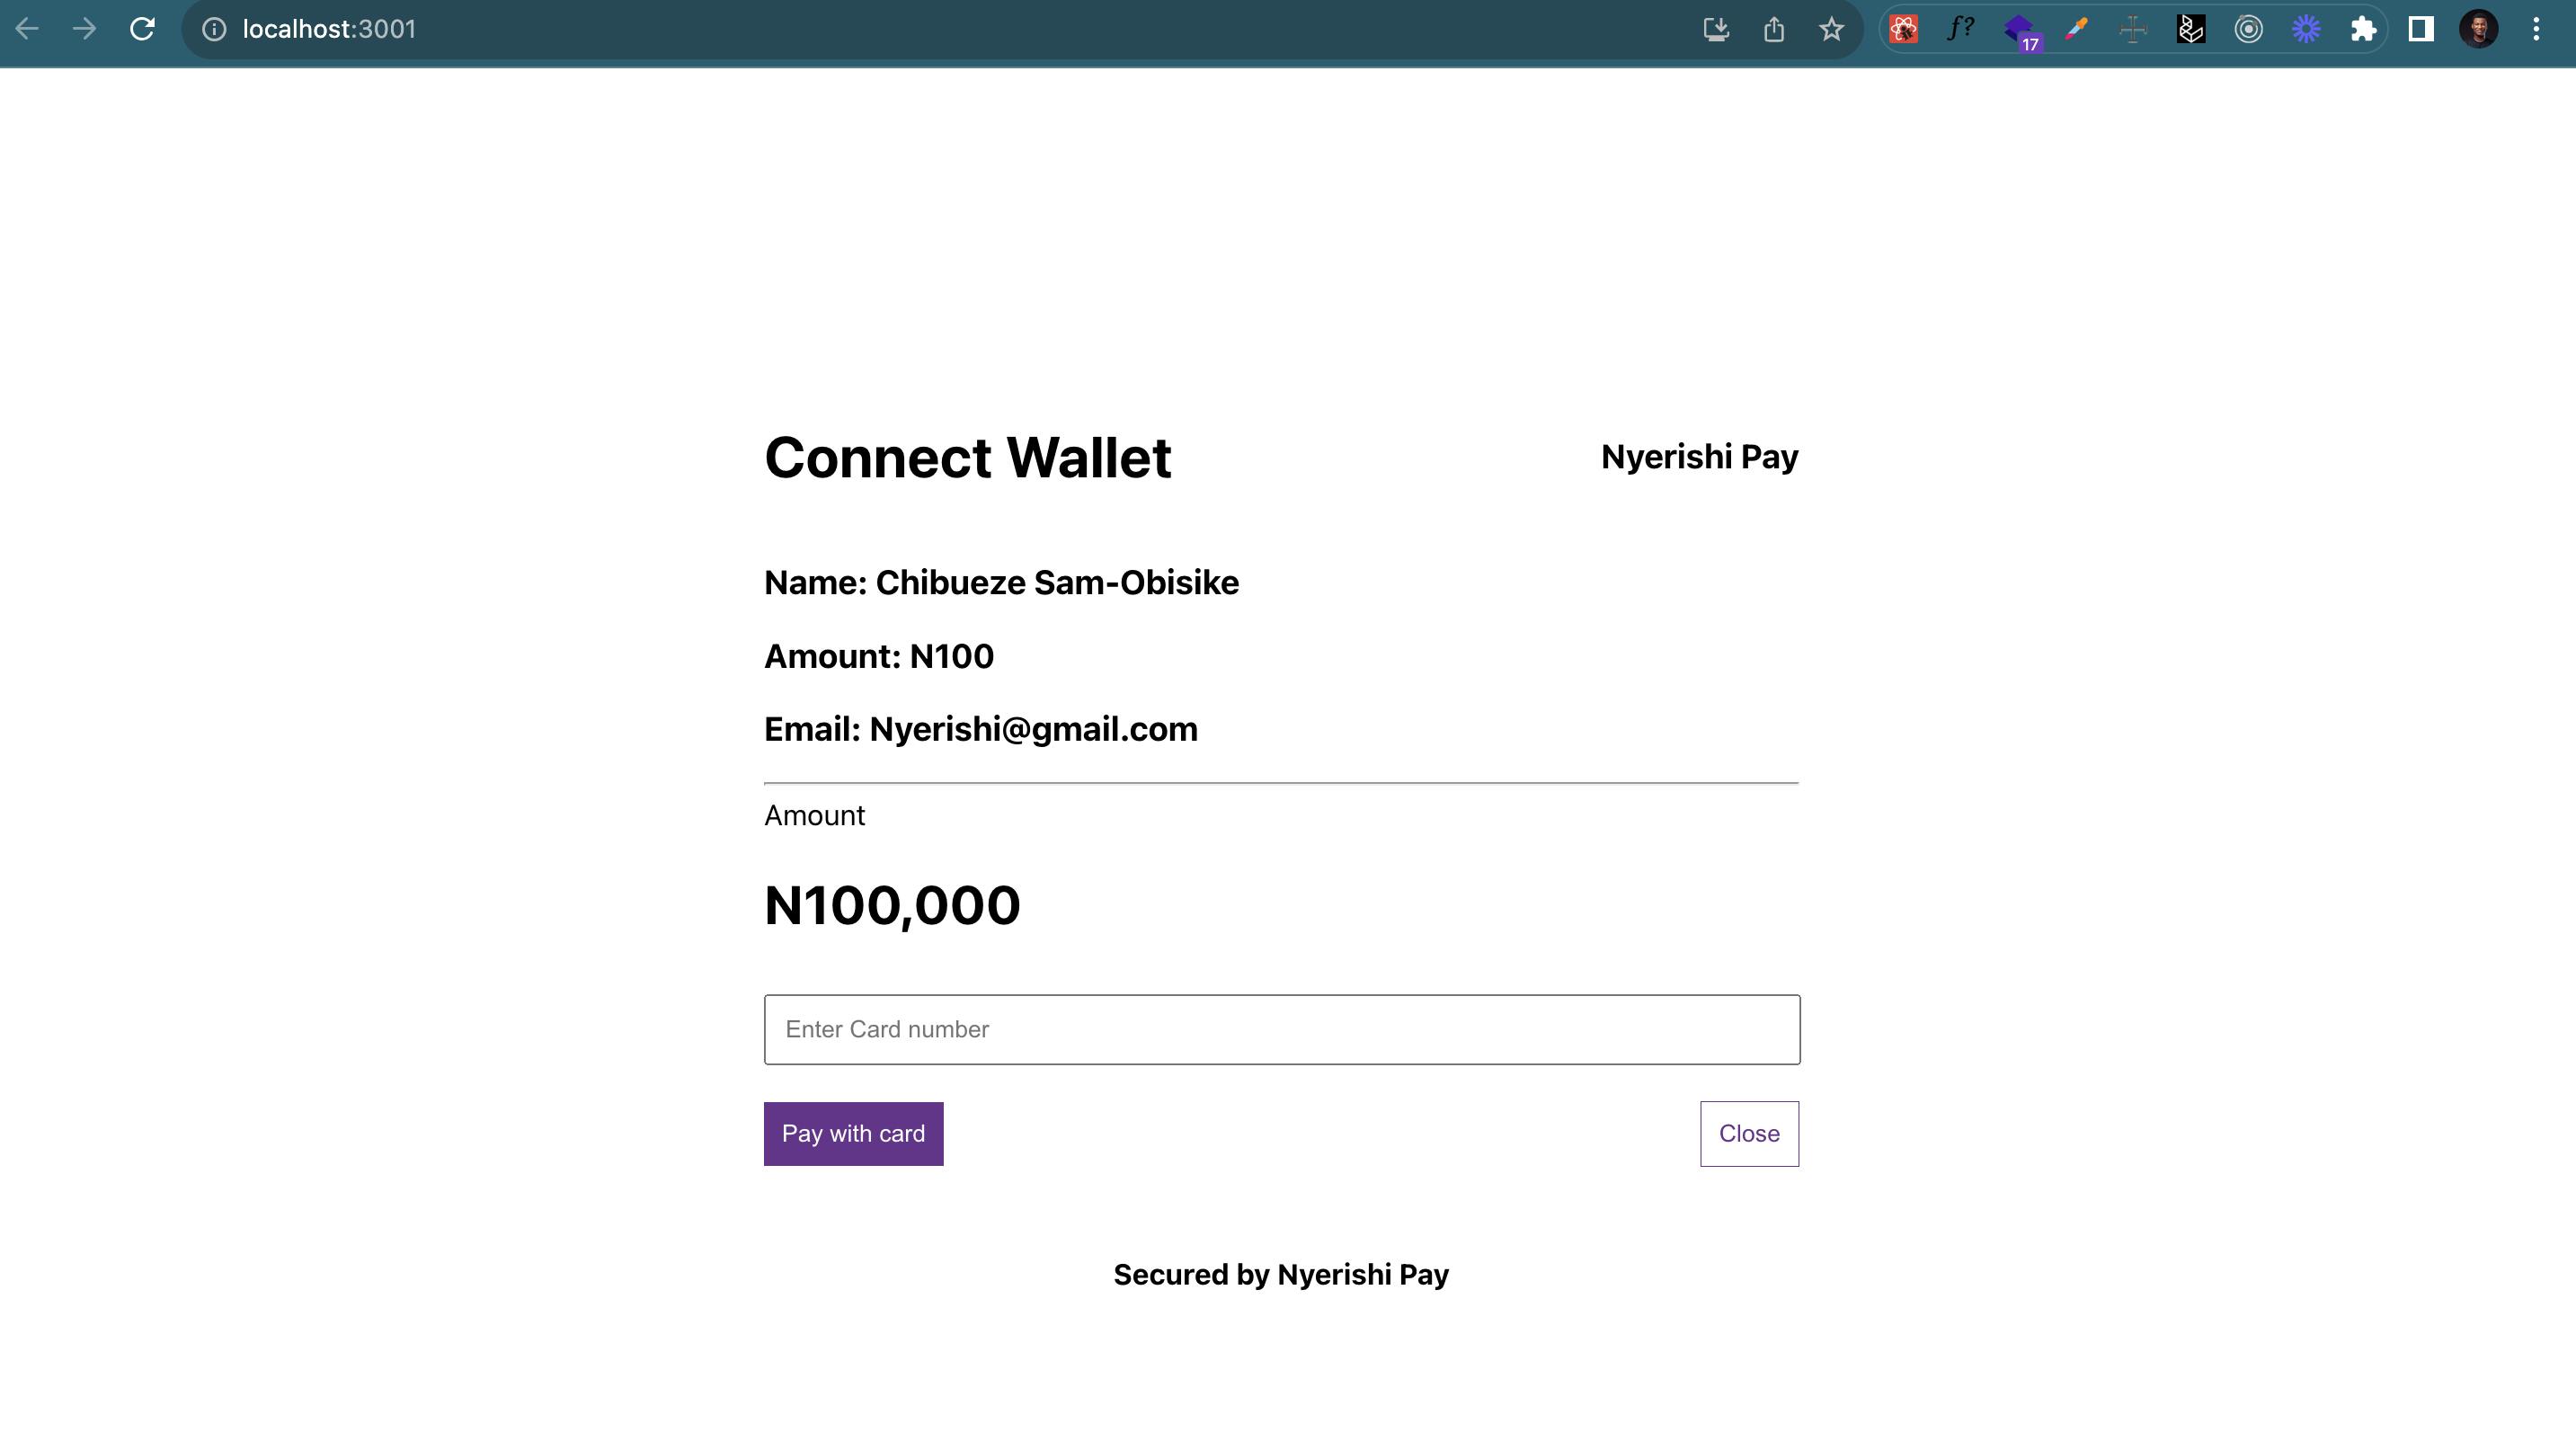
This represents the interface for our payment acceptance application, developed using React. Feel free to customize the UI according to your preferences for accepting payments. Below, you'll find the code for the user interface.
import { useState, useEffect } from "react";

function App() {

  const handleCloseClick = () => { };
  const handleSuccessClick = () => {};

  return (
    <div
      style={{
        display: "flex",
        alignItems: "center",
        justifyContent: "center",
        height: "100vh",
        margin: "0px auto",
        flexDirection: "column",
      }}
    >
      <div style={{ background: "#fff", padding: "40px", width: "40vw" }}>
        <div
          style={{
            display: "flex",
            alignItems: "center",
            justifyContent: "space-between",
          }}
        >
          <h1>Connect Wallet</h1>
          <h3>Nyerishi Pay</h3>
        </div>
        <h3>Name: Chibueze Sam-Obisike</h3>
        <h3>Amount: N100</h3>
        <h3>Email: Nyerishi@gmail.com</h3>
        <hr />
        <p style={{ lineHeight: "0" }}>Amount</p>
        <h5 style={{ fontSize: "30px", lineHeight: 0 }}>N100,000</h5>
        <input
          placeholder='Enter Card number'
          style={{ width: "96%", padding: "10px", margin: "0 auto" }}
        />
        <div style={{ display: "block", marginTop: "20px" }}>
          <div
            style={{
              display: "flex",
              alignItems: "center",
              justifyContent: "space-between",
            }}
          >
            <button
              style={{
                background: "#62318B",
                outline: "none",
                border: "none",
                padding: "10px",
                color: "#fff",
                cursor: "pointer",
              }}
              onClick={handleSuccessClick}
            >
              Pay with card
            </button>
            <button
              style={{
                border: ".5px solid #62318B",
                outline: "none",
                padding: "10px",
                background: "#fff",
                color: "#62318B",
                cursor: "pointer",
              }}
              onClick={handleCloseClick}
            >
              Close
            </button>
          </div>
        </div>
      </div>
      <div style={{ marginTop: "10px", fontWeight: "bold", zIndex: 99 }}>
        Secured by Nyerishi Pay
      </div>
    </div>
  );
}

export default App;
Building the SDK
Let's go into building the SDK proper, in this part we need to understand iframes and how they work.
What is an iframe?
An inline frame (iframe) is a HTML element that loads another HTML page within the document. It essentially puts another webpage within the parent page. They are commonly used for advertisements, embedded videos, web analytics and interactive content.
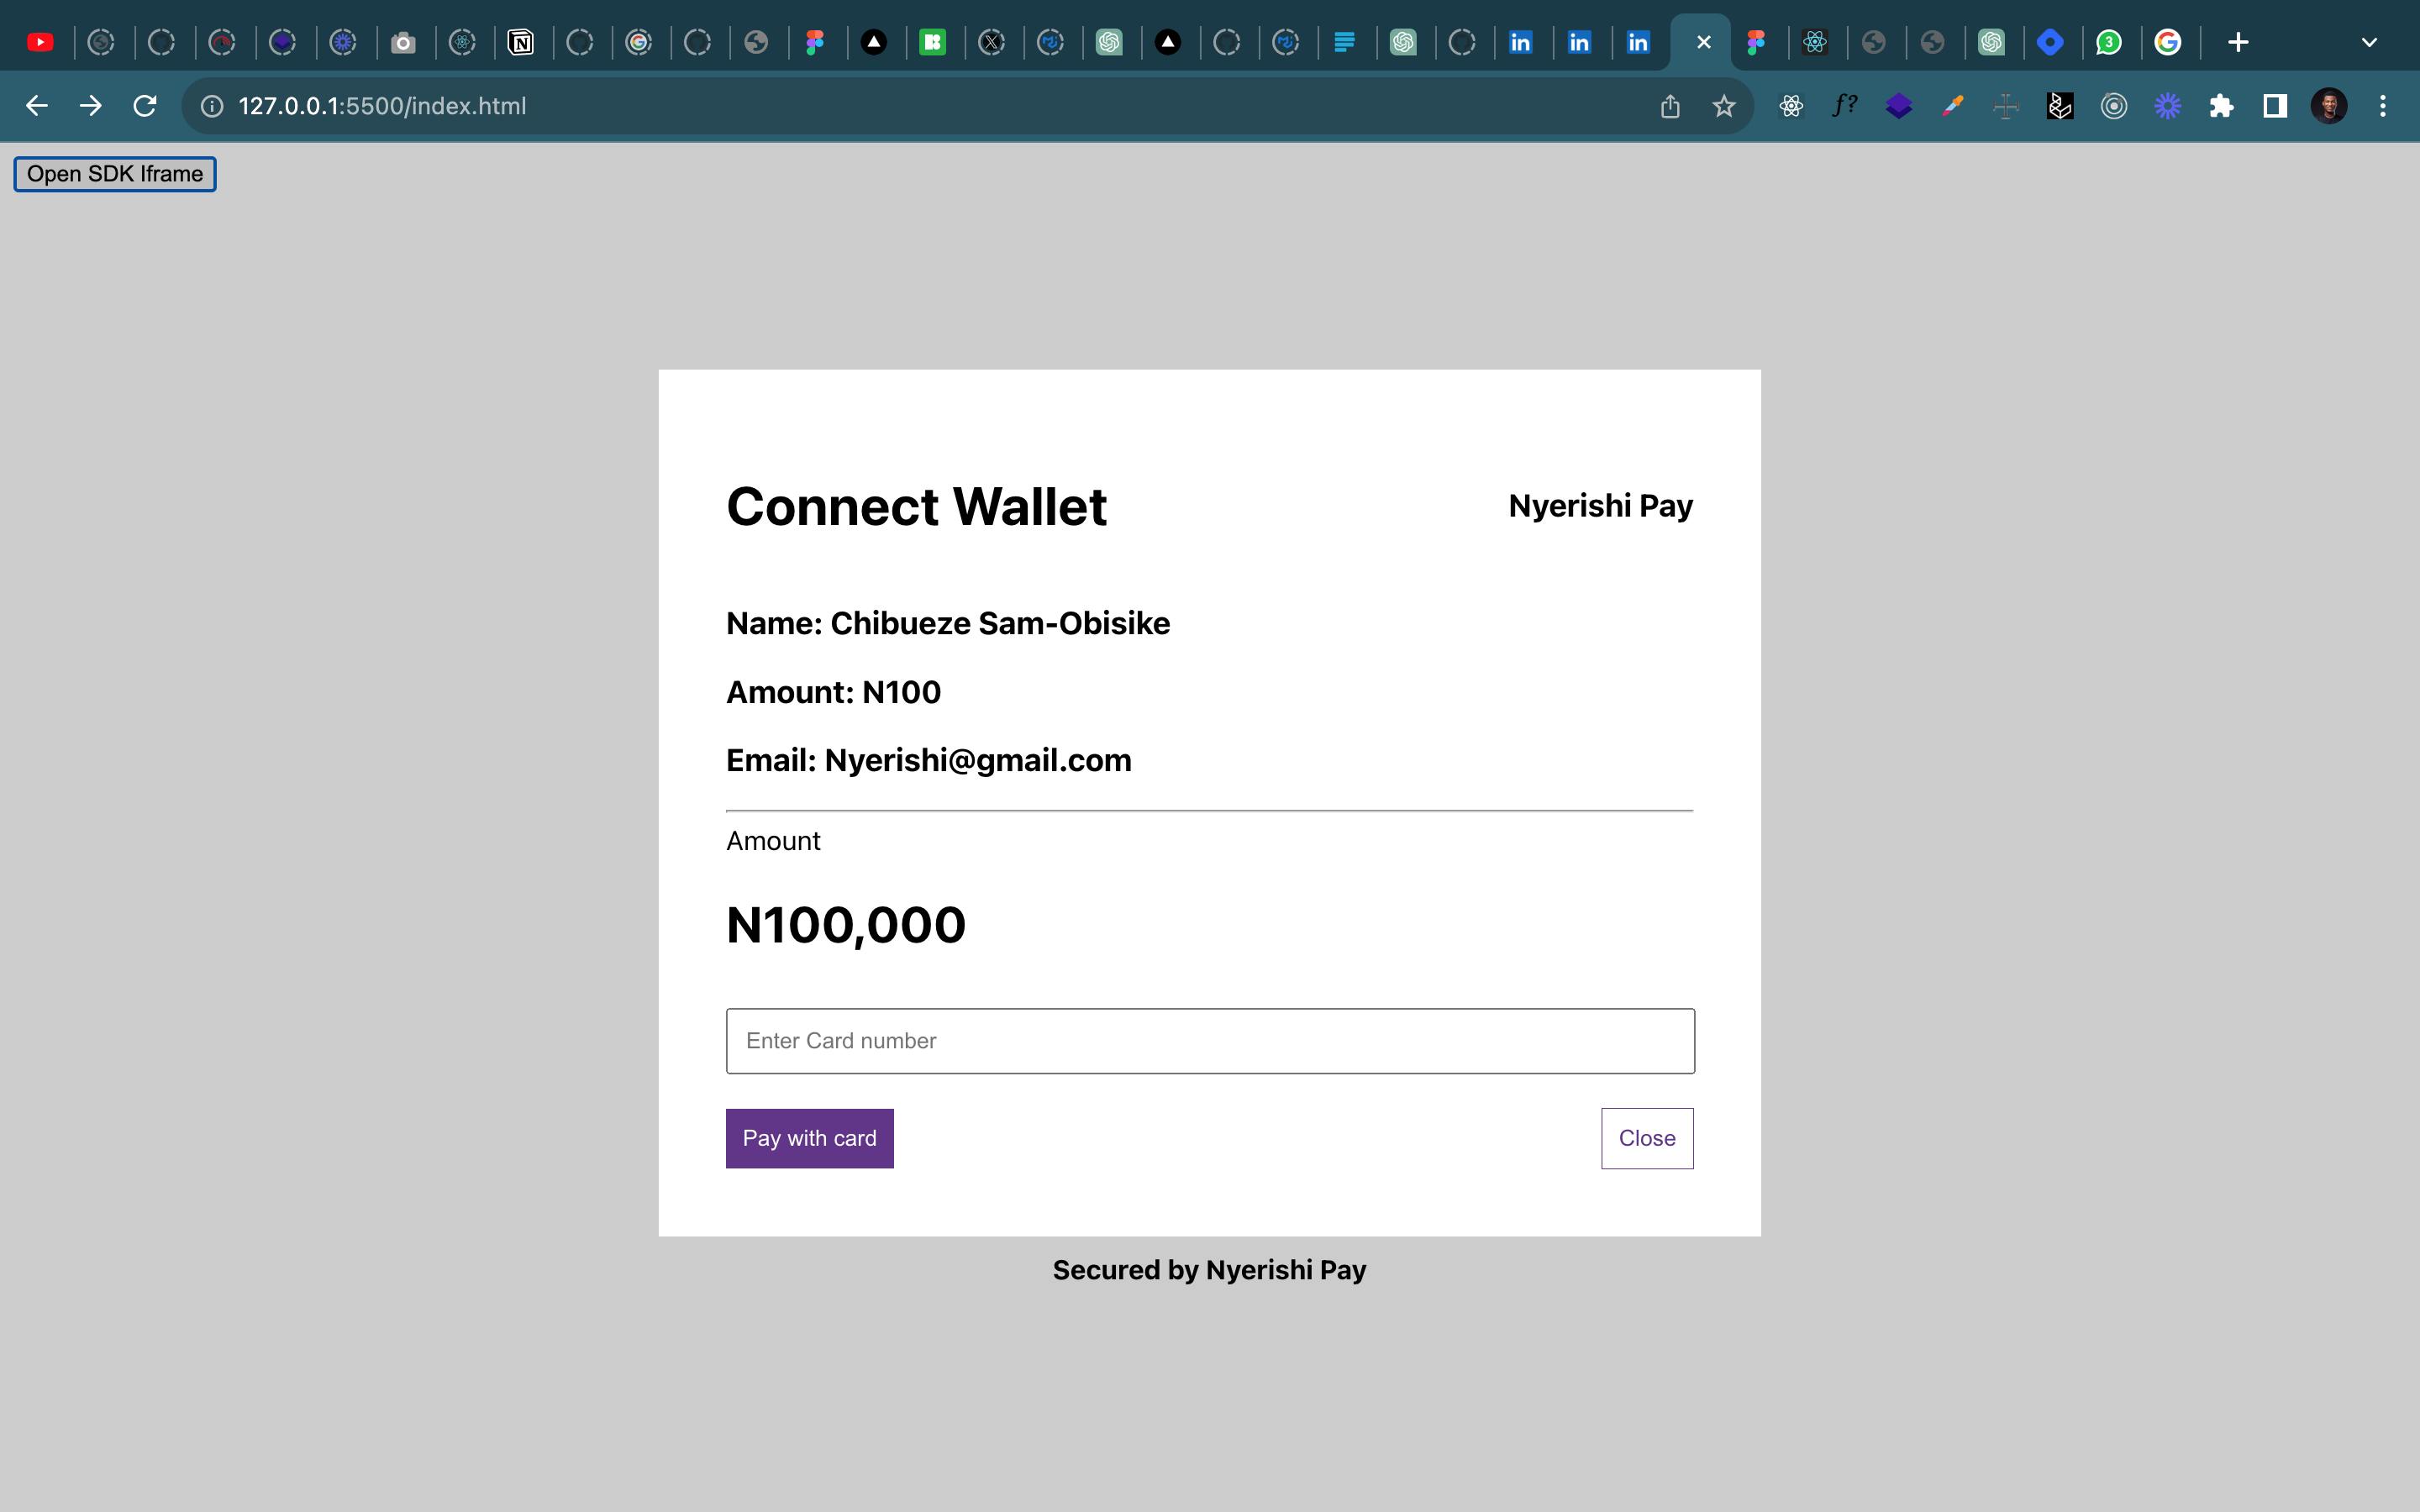
Essentially, we can load another webpage, like the React application mentioned above, into an iframe. In this example, it's running on port 3001.
   const iframe = document.createElement("iframe");
    iframe.src = "<http://localhost:3001>";
This code allows the iframe to load another webpage, which is the React application.
Here's what it looks like when we load the above into our iframe.
To build the SDK effectively, we will use an Object-Oriented Programming (OOP) approach. This makes the SDK easy to inject and initialize.
The structure I used is as follows:
Create a class.
The constructor should accept onSuccess, onClose, onError, and a config.
An init function that opens an iframe and sends the config received from the SDK to the React Application.
Include various utility functions.
Set up a code base this way
mkdir sdk-test
cd sdk-test
code .
npm i -y
touch index.js
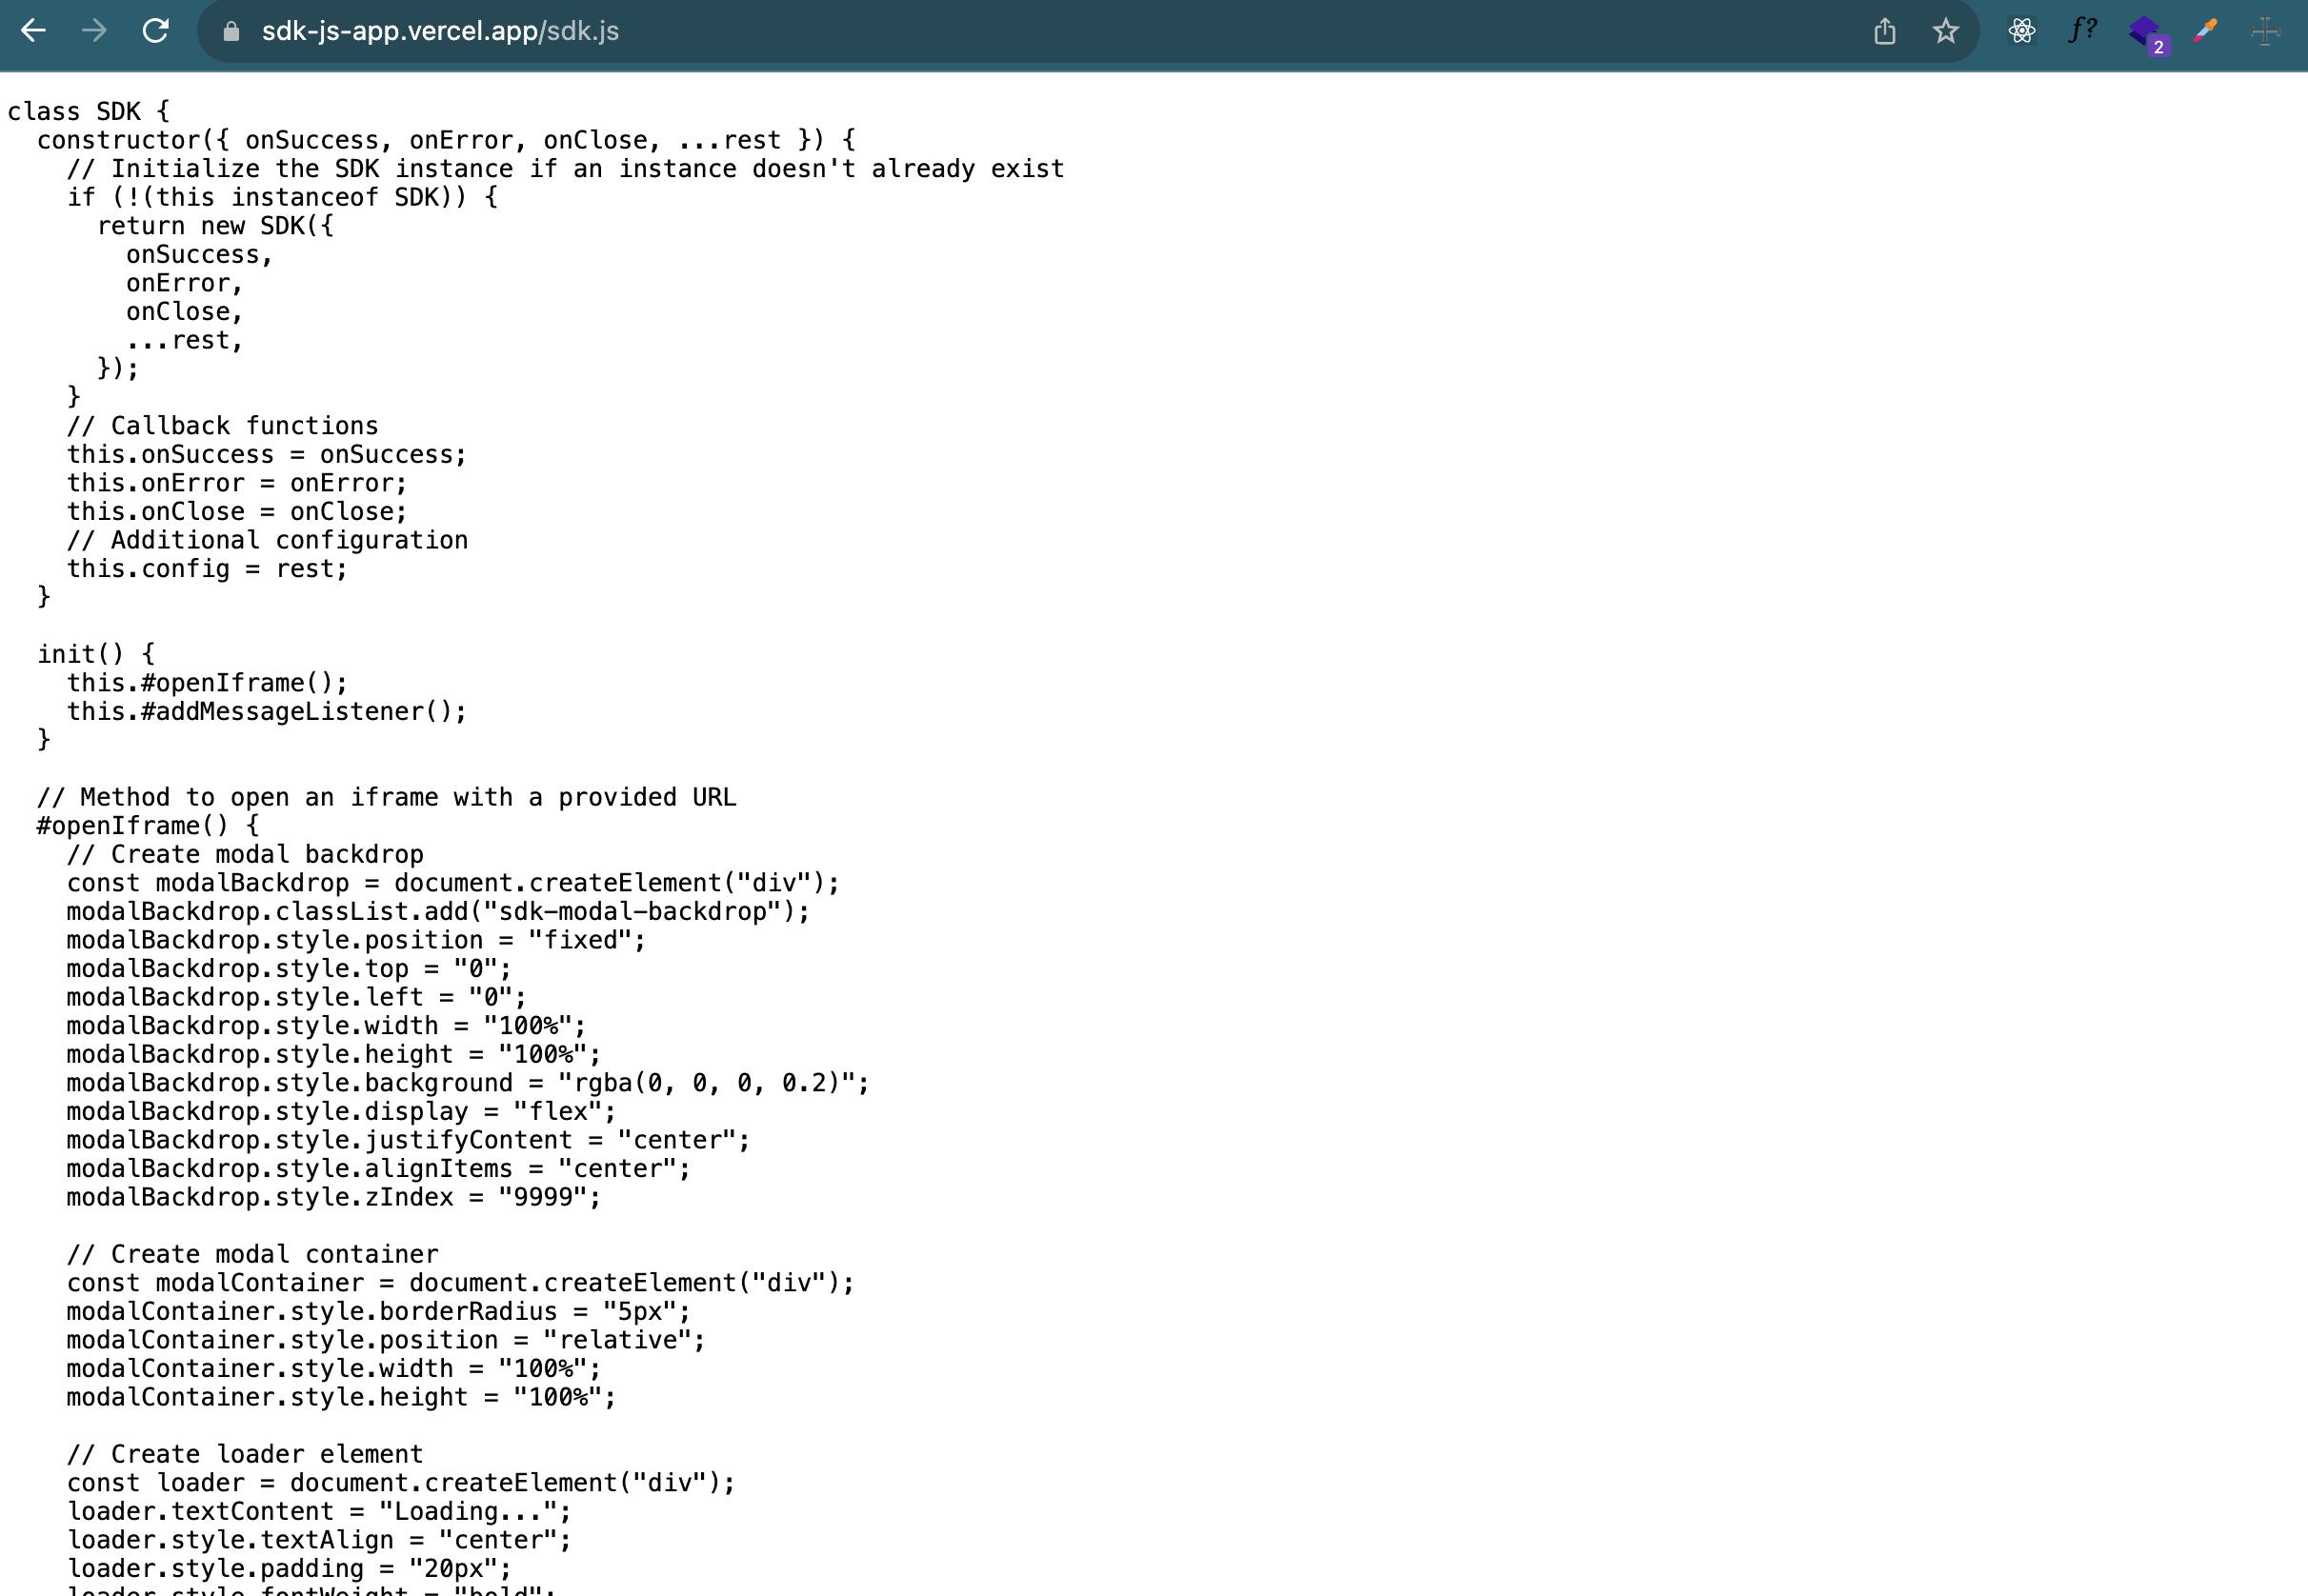
Paste the code below in the sdk.js file
class SDK {
  constructor({ onSuccess, onError, onClose, ...rest }) {
    // Initialize the SDK instance if an instance doesn't already exist
    if (!(this instanceof SDK)) {
      return new SDK({
        onSuccess,
        onError,
        onClose,
        ...rest,
      });
    }
    // Callback functions
    this.onSuccess = onSuccess;
    this.onError = onError;
    this.onClose = onClose;
    // Additional configuration
    this.config = rest;
  }

  init() {
    this.#openIframe();
    this.#addMessageListener();
  }

  // Method to open an iframe with a provided URL
  #openIframe() {
    // Create modal backdrop
    const modalBackdrop = document.createElement("div");
    modalBackdrop.classList.add("sdk-modal-backdrop");
    modalBackdrop.style.position = "fixed";
    modalBackdrop.style.top = "0";
    modalBackdrop.style.left = "0";
    modalBackdrop.style.width = "100%";
    modalBackdrop.style.height = "100%";
    modalBackdrop.style.background = "rgba(0, 0, 0, 0.2)";
    modalBackdrop.style.display = "flex";
    modalBackdrop.style.justifyContent = "center";
    modalBackdrop.style.alignItems = "center";
    modalBackdrop.style.zIndex = "9999";

    // Create modal container
    const modalContainer = document.createElement("div");
    modalContainer.style.borderRadius = "5px";
    modalContainer.style.position = "relative";
    modalContainer.style.width = "100%";
    modalContainer.style.height = "100%";

    // Create loader element
    const loader = document.createElement("div");
    loader.textContent = "Loading...";
    loader.style.textAlign = "center";
    loader.style.padding = "20px";
    loader.style.fontWeight = "bold";
    loader.style.color = "white";
    loader.style.height = "100vh";
    loader.style.display = "flex";
    loader.style.alignItems = "center";
    loader.style.justifyContent = "center";

    modalContainer.appendChild(loader);
    modalBackdrop.appendChild(modalContainer);
    document.body.appendChild(modalBackdrop);

    // Create iframe element
    const iframe = document.createElement("iframe");

    // The source link is the link to deployed react application running on vercel
    iframe.src = "https://sdk-react-app.vercel.app/";

    iframe.style.width = "100%";
    iframe.style.height = "100%";
    iframe.style.border = "none";

    // When iframe is fully loaded
    iframe.onload = () => {
      // Send initial data to iframe
      iframe.contentWindow.postMessage(
        {
          type: "sdkData",
          config: this.config,
        },
        "*"
        //This means the host application which is the react app
      );
      // Remove loader and display iframe
      modalContainer.removeChild(loader);
      modalContainer.appendChild(iframe);
      modalContainer.style.display = "block";
    };

    // Handle iframe loading error
    iframe.onerror = () => {
      loader.textContent = "Failed to load the content.";
      setTimeout(() => {
        this.#closeIframe();
      }, 2000);
    };

    modalContainer.appendChild(iframe);
  }

  // Method to close the iframe
  #closeIframe() {
    const modalBackdrop = document.querySelector(".sdk-modal-backdrop");
    if (modalBackdrop) {
      document.body.removeChild(modalBackdrop);
    }
  }

  // Method to send data to the host
  sendToHost(data) {
    window.parent.postMessage(data, "*");
  }

  // Method to add message event listener
  #addMessageListener() {
    window.addEventListener("message", (event) => {
      // Check the event source for security reasons
      const data = event.data;

      if (event.data.type === "close") {
        this.#closeIframe();
      }

      // Handle data received from the SDK
      if (event.data?.type === "success") {
        this.onSuccess(data);
      }
    });
  }
}

module.exports = { SDK };
Let's break down the code.
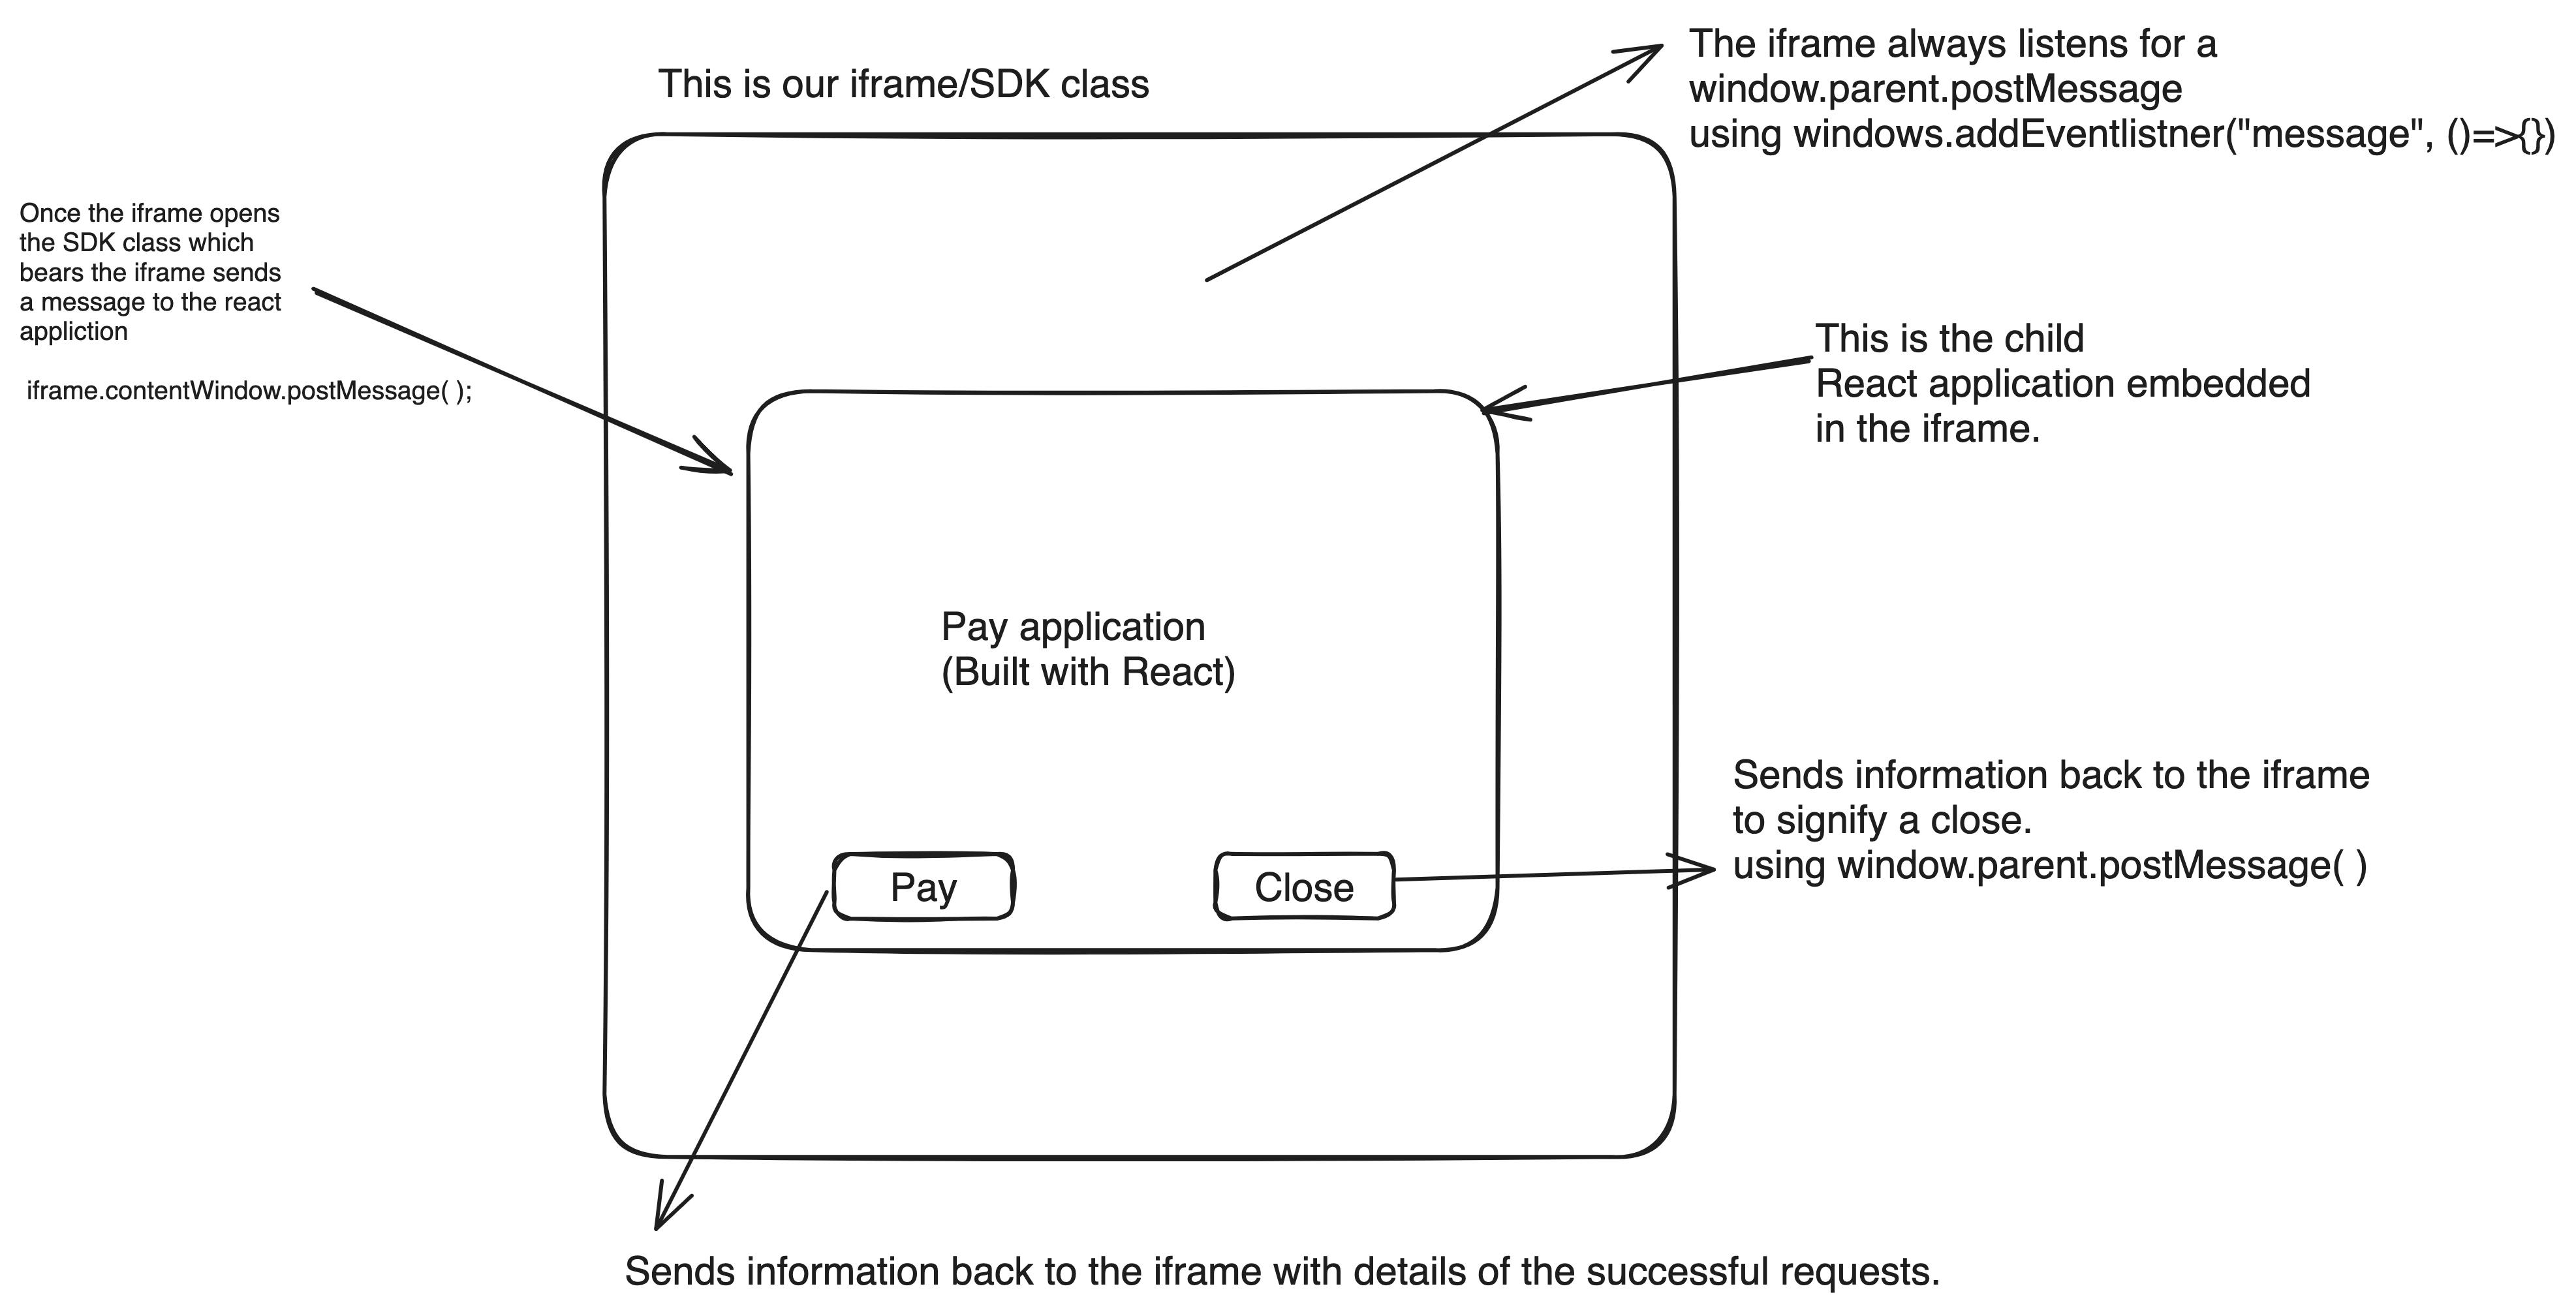
Upon critical examination, we'll notice cross-communication. There's a message sender and a listener.
Once the iframe is properly loaded, we send information to the iframe source, which is the react application, by using:
 iframe.contentWindow.postMessage(
        {
          type: "sdkData",
          config: this.config,
        },
        "*"
        //This means the host application which is the react app
      );
The "*" signifies the source application. We can be more specific by using localhost:3001. In the next section, I'll demonstrate how to listen for this event in the React application. This enables us to retrieve configuration data such as name, amount, email, and other necessary details, which can then be used for display and API calls in the React application.
In the openIframe( ) method, we first manipulate the DOM to set up the iframe container, display a loader before the iframe loads, and remove some default styling.
The iframe.onerror( ) method is used to handle errors in case our iframe doesn't load properly.
#addMessageListener()
This method listens for events from the React application and includes a callback with an event object. This object can be used to examine the details of the received event. To understand this further, we need to delve into the React application and attempt to send messages. Keep in mind that the React application is a child of the iframe.
The Pay application (The React application)
The payment application houses the core logic for payments. The iframe simply hosts this application, making it easily accessible for other integrations.
Typically, the payment application interacts with numerous APIs from an external backend.
function App() {
  const postMessageToListeners = ({ event, data }) => {
    window.parent && window.parent.postMessage({ type: event, data }, "*");
  };

  const handleCloseClick = () => postMessageToListeners({ event: "close" });

  const handleSuccessClick = () => {
    const transactionData = {
      type: "transaction",
      transaction: {
        // transaction data here
      },
    };
    postMessageToListeners({ event: "success", data: transactionData });
  };

  const [config, setConfig] = useState({});

  useEffect(() => {
    const handleMessage = (event) => {
      if (event.data.type === "sdkData") {
        console.log("SDK D", event?.data);
        setConfig(event.data.config?.config);
      }
    };

    window.addEventListener("message", handleMessage);

    return () => {
      window.removeEventListener("message", handleMessage);
    };
  }, []);

  return (
    <div style={{ display: "flex", alignItems: "center", justifyContent: "center", height: "100vh", margin: "0 auto", flexDirection: "column" }}>
      <div style={{ background: "#fff", padding: "40px", width: "40vw" }}>
        <div style={{ display: "flex", alignItems: "center", justifyContent: "space-between" }}>
          <h1>Connect Wallet</h1>
          <h3>Nyerishi Pay</h3>
        </div>
        <h3>Name: {config.name}</h3>
        <h3>Name: Chibueze Sam-Obisike</h3>
        <h3>Amount: {config.amount}</h3>
        <h3>Email: Nyerishi@gmail.com</h3>
        <hr />
        <p style={{ lineHeight: "0" }}>Amount</p>
        <h5 style={{ fontSize: "30px", lineHeight: 0 }}>N100,000</h5>
        <input placeholder='Enter Card number' style={{ width: "96%", padding: "10px", margin: "0 auto" }} />
        <div style={{ display: "block", marginTop: "20px" }}>
          <div style={{ display: "flex", alignItems: "center", justifyContent: "space-between" }}>
            <button style={{ background: "#62318B", outline: "none", border: "none", padding: "10px", color: "#fff", cursor: "pointer" }} onClick={handleSuccessClick}>Pay with card</button>
            <button style={{ border: ".5px solid #62318B", outline: "none", padding: "10px", background: "#fff", color: "#62318B", cursor: "pointer" }} onClick={handleCloseClick}>Close</button>
          </div>
        </div>
      </div>
      <div style={{ marginTop: "10px", fontWeight: "bold", zIndex: 99 }}>Secured by Nyerishi Pay</div>
    </div>
  );
}
Let's review the functions individually.
postMessageToListeners
   const postMessageToListeners = ({ event, data }) => {
     window.parent && window.parent.postMessage({ type: event, data }, "*");
   };
Remember, our React application runs inside an iframe. To send information to the parent application, we post a message using
window.parent.postMessage({ type: event, data }, "*"). Here, the "*" represents the parent container, which is the iframe. Note that in our SDK class (addEventListener), we listen for a specific type and perform different operations based on that type.handleCloseClick
const handleCloseClick = () => postMessageToListeners({ event: "close" });To close the iframe (i.e., the SDK) from its child application (the React app), we post a message to the iframe with a 'close' event type. The SDK class listens for this event and closes the iframe if it receives a 'close' event.
handleSuccessClick
   const handleSuccessClick = () => {
     const transactionData = {
       type: "transaction",
       transaction: {
         id: "transaction-identifier",
         remark: "medicine",
         amount: 50000,
         currency: "NGN",
         charge: 0,
         type: "peer",
         refund: false,
         channel: "send",
         status: "success",
         user: {
           name: "Tim Cook",
           identifier: "tim",
           identifier_type: "username",
           email: "tim@apple.com",
           reference: "one-more-thing",
           created_at: "2020-05-06T12:00:00.000Z",
           updated_at: "2020-05-06T12:00:00.000Z",
         },
         created_at: "2021-04-12T19:52:22.000000Z",
         updated_at: "2021-04-12T19:52:22.000000Z",
       },
     };
     postMessageToListeners({ event: "success", data: transactionData });
   };
Let's assume that after clicking on 'Pay with card', we receive an API response containing transactionData in JSON format, as described above. If the payment is successful, we need to inform the iframe about the successful transaction. We do this by posting data to the iframe with an event and a type.
This will help cause when we initialize our application we initialize it with an
onSuccess, onError, onClose. As seen belowfunction onSuccess(data) { console.log("Data from Onsuccess", data?.data?.transaction); } function onError(data) {} function onClose(data) {} const sdk = new SDK({ onSuccess, onError, onClose, config: { name: "Nyerishi", amount: 300 }, });IIn our addEventListener, we add different listeners for different events, as shown below in the SDK class.
#addMessageListener() { window.addEventListener("message", (event) => { // Check the event source for security reasons const data = event.data; if (event.origin !== "<http://localhost:3001>") { return; } if (event.data.type === "close") { this.#closeIframe(); } // Handle data received from the SDK if (event.data?.type === "success") { this.onSuccess(data); } console.log("Data received from SDK:", data); }); }Let us delve deeper into the event listener and the useEffect within the React application.
It declares a state variable called
configusing theuseStatehook. The initial value ofconfigis an empty object{}.It defines a function called
handleMessagethat takes an event as a parameter.Inside
handleMessage, it checks if the type of data received in the event is"sdkData". If it is, then it updates theconfigstate with theconfigproperty from the data received in the event.It adds an event listener to the window object to listen for messages. When a message is received, it calls the
handleMessagefunction.It uses the
useEffecthook to clean up the event listener when the component unmounts, ensuring there are no memory leaks.
Now our SDK is all setup, let use create an index.html file to set up the SDK. In the sdk-test folder.
<!DOCTYPE html>
<html>
<head>
<title>Host Application</title>
</head>
<body>
<script src="./sdk.js"></script>
<button id="sendMessageButton" onclick="openSDKIframe()">
Open SDK Iframe
</button>
<script>
    function onSuccess(data) {
      console.log("Data from Onsuccess", data?.data?.transaction);
    }
    function onError(data) {}
    function onClose(data) {}
    const sdk = new SDK({
         onSuccess,
         onError,
         onClose,
         config: { name: "Nyerishi", amount: 300 },
       });
// Function to open the SDK iframe5
function openSDKIframe() {
// Replace 'your-sdk-url' with the URL you want to load in the iframe
sdk.init();
}
</script>
</body>
</html>
This would perfectly work however it is just in our local machine as in our script file we import
<script src="./sdk.js"></script>
Now that we have a JS and HTML file, let's set up our own CDN link. We can deploy these files on any hosting provider, such as Vercel. I used Vercel to deploy my application, which can be found here. The code for the application is available on my GitHub.
However, when Vercel deploys our apps, it accesses the file system of the deployed application. My live deployed project is https://sdk-js-app.vercel.app/
I can access the file sdk.js, by adding the name of the file with the js extension as a route. https://sdk-js-app.vercel.app/sdk.js
If we access the previously mentioned route, we obtain the JavaScript. We can then inject the code into any file using this route as our CDN.
So our html will now look like
<!DOCTYPE html>
<html>
  <head>
    <title>Host Application</title>
  </head>
  <body>
    <script src="<https://sdk-js-app.vercel.app/sdk.js>"></script>
    <button id="sendMessageButton" onclick="openSDKIframe()">
      Open SDK Iframe
    </button>

    <script>
      function onSuccess(data) {
        console.log("Data from Onsuccess", data?.data?.transaction);
      }
      function onError(data) {}
      function onClose(data) {}
      const sdk = new SDK({
        onSuccess,
        onError,
        onClose,
        config: { name: "Nyerishi", amount: 300 },
      });
      // Function to open the SDK iframe5
      function openSDKIframe() {
        sdk.init();
      }
    </script>
  </body>
</html>
Now that our CDN value has been deployed, you can use the SDK in any HTML application. Remember to also deploy the React application and replace all localhost links with the deployed value.
The complete code is:
For the react, pay application: https://github.com/ChibuezeSamObisike/sdk-react-app
For the test application that contains the SDK code and test html: https://github.com/ChibuezeSamObisike/sdk-js-app
To integrate the SDK above in your application kindly paste this code in your body tage
<script src="https://sdk-js-app.vercel.app/sdk.js"></script>
    <button id="sendMessageButton" onclick="openSDKIframe()">
      Open SDK Iframe
    </button>

    <script>
      function onSuccess(data) { }
      function onError(data) {}
      function onClose(data) {}
      const sdk = new SDK({
        onSuccess,
        onError,
        onClose,
        config: { name: "Nyerishi", amount: 300 },
      });

      function openSDKIframe() {
        sdk.init();
      }
    </script>
</script>
Conclusion:
With this article I was able to build a payment SDK that can integrated across any application.
Thank you, I hope to get your reviews and hear from you